
Motorola Moto G is the popular budget Phone that ruled the sales last year. Motorola promised to update the phone to latest version of Android Lollipop 5 when the Google released the update last year. Since then, Moto G users are eagerly waiting to taste the Android L (Lollipop 5) on their Smartphones.
Last Week, Motorola engineer announced that the Android Lollipop 5.0.2 will be released to all the Moto G users via OTA update. However, till now, there is no official release date from Motorola about the Android Lollipop 5.0.2.
If you don’t want to wait and touch the Lollipop 5.0.2 before the anyone, you can use install CyanogenMod Android 5 Custom ROM.
Why CyanogenMod?
CyanogenMod is the Popular Custom ROM for the Android Smartphones. CyanogenMod team have confirmed that the new CM12 is Nightly version of AOSP (Android Open Project) 5.0.2 Lollipop. This CM12 Android 5 Operating System will have Stock version of Android with useful customized features.
CyanogenMod 12 firmware is not yet completed. It might have some bugs, issues. However, I’ve tested the latest nightly version of CyanogenMod with Custom Kernels to make things work. For the last three days, I’ve used the Moto G without any Major Issues for daily use.(Tested on Dual SIM XT1033).
Like, Few Features of CM12 (some of them not implemented)
- Theme Engine
- Quick Settings reorganization and customization
- Quick Settings Ribbon mode
- Navigation bar reorganization and customization
- Sound panel customization
- Lock-screen quick unlock
Requirements
- Unlocked Bootloader Moto G
- Custom Recovery
- CyanogenMod 11 Stable or nightly version ROM
- CyanogenMod 12 ROM
How to Unlock The Moto G BootLoader
Please follow the steps here at Motorola site.
How to Flash the Custom Recovery on Moto G Phone
By default, Your Moto G phone will have Stock Recovery to perform the recovery, reset and other important functions.
To install Android Lollipop 5.0.2 CM12 nightly, you need custom recovery like Philz Touch Recovery.
Here, We’ll install the Custom Recovery Philz Touch compatible to KitKat to back your Current Android OS ROM. This Backup will help you to reinstall the Current OS back again.
1. Now, Connect your Moto G to your PC using USB Cable.
2. Now, type the following command in Command Prompt or Ubuntu (Linux) or Mac OS X terminal,
adb devices
3. The above command will list the devices attached to the PC. If not, then install Motorola Device Drivers from the Moto site.
4. If you devices listed, the type the commands one by one,
Download PhilZ Touch Recovery 6.50.6
adb reboot bootloader
fastboot devices
fastboot flash recovery [recovery location and name].img
eg: fastboot flash recovery C:\Downloads\philz_touch_6.50.6-falcon.img
Now, Take Nandroid Back from the Options listed in Phone screen. (Backup/Restore).
Now, You have to Flash the Latest version of PhilZ Touch Recovery to install Android Lollipop 5.0.2 CM12.
Download PhilZ Touch Recovery 6.59.0
Steps to install Android Lollipop 5.0.2 on Moto G (CM 12 Official) First Gen etc.
To install the CyanogenMod 12 Android Lollipop in your Stock Android Moto G Phone, You have to install CyanogenMod 11 first. This is not necessary, however, some users have bootloop issues when they directly installed CM 12.
1. Download the CyanogenMod 11 Stable version
2. Connect your Moto G via USB Cord to your PC
3. Place the Downloaded Zip file in the Downloads or any other Folder in the Phone Storage.
4. In the Command Prompt or Terminal type,
adb devices
adb reboot bootloader
or Press the power + Volume Down button for 30 seconds to get the Fastboot recovery screen.
5. Now Choose Recovery option in the boot screen. it will load the PhilZ touch Custom Recovery.
6. Now, Tap on Wipe Data/Factory Reset and Choose “Clean to install New ROM”.
7. Also ‘wipe dalvik cache, Date Cache’ [Note: This step is optional ]
8. Now Choose the +++Goback+++ and choose the ‘install zip from SD card’. This will open all folders in storage. There, you can choose Downloads folder and CyanogenMod 11 Zip file. Then Tab Yes.
9. That’s it. It will install CM11 and you will get Reboot message. Just go back and Reboot the Phone.
After rebooting, your phone will load CM11 KitKat.
Now, Download CyanogenMod 12 nightly 27 and Place that in the Phone Downloads Folder.
Then Follow the steps from 2 to 8. In the step 8 choose the CM 12 Zip in the Downloads Folder.
Now your device (Moto G 1st Gen) will take a few minutes to complete the booting process.
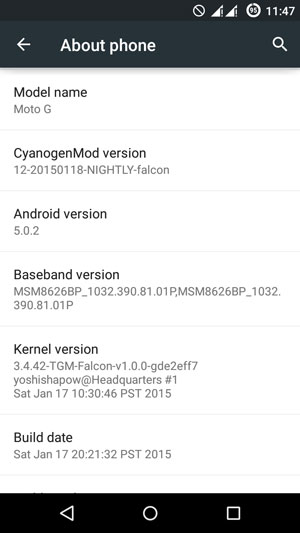
Next, Go to the settings and About phone to see the Android Version.
How to Flash GAPPS in Moto G Lollipop 5.0.2 CM12
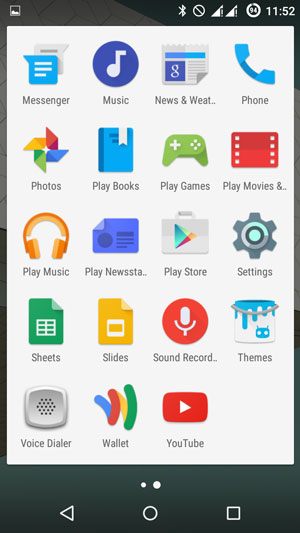
By default, CM12 will not have Google Apps like Playstore, Gmail, etc. However, You can flash those apps like you did above.
Download GAPPS Here for Lollipop CM12. (Choose any Package)
And Check WiFi, Call, Mobile Data functions. If you face problems in Wifi Turning on bug or No Signal in the Network Icon, you have to install Custom Kernel to fix these things.
How to Flash Custom Kernels in Moto G Lollipop 5.0.2 CyanogenMod 12
1. Like the above steps, you have to download Custom Kernel Zip file and place that in the Downloads folder and flash the file using ‘install zip from SD card’.
I’ve tested many Android Linux Custom Kernels for Moto G and TGM- Hybrid Kernel fixes the Dual SIM Networks and wifi issues.
Download tgm-hybrid Kernel Here.
NOTE: Your warranty is now void. We (SpicyTricks) are not responsible for bricked devices, dead SD cards, etc..
If you have any issues, post it in the comment section. We’ll try help you.


