
Windows 10 Operating System has changed the Windows users Computer experience to the new level. Windows 10 has lost the Trademark Start Button, Start menu and got the New Metro Apps with stylish Start screen and more. These multiple changes have been made to bring the Mobile computing experience to the Desktop Users. It’s because, the whole world is changing to Smartphones, Tablets and so on. To catch these Mobile Market, Microsoft has taken the bold step and bring the much polished and advanced Windows 10.
Now, the Windows 10.1 has also out to the market that fixed and enhanced the issues in Windows to please the Windows loyal users. However, You need some handful guide to use the Windows 10 to get the Premium Computing experience. Windows 10 has two customizable interfaces, one is familiar Windows Desktop and Other One is Live Tiled Modern Start Screen. This dramatic change in Windows needs the steep learning curve to understand the things better.
This is where our Windows 10 Tips and Tricks complete guide comes in and will take you to inch closer to this modern Operating System.
Windows 10 Tips and Tricks
1. Top Windows 10 Keyboard Shortcuts
Windows 10 has changed the tradition of Windows by Introducing the new Interface and has brought many aesthetic features. So, Windows 10 has got some new shortcuts that will be useful to you to make things easier. Let’s see the new Windows 10 Keyboard Shortcuts,
WinKey + C = Will Open the Charms Bar
WinKey + F = Search Files
WinKey + W =Search Settings
WinKey + Q = Windows 10 Search Field
WinKey + I = Opens the Settings Menu
WinKey + D = Opens the Devices menu
WinKey + H = Brings the Share Menu
2. Access All Settings in Windows 10 with “GOD MODE”
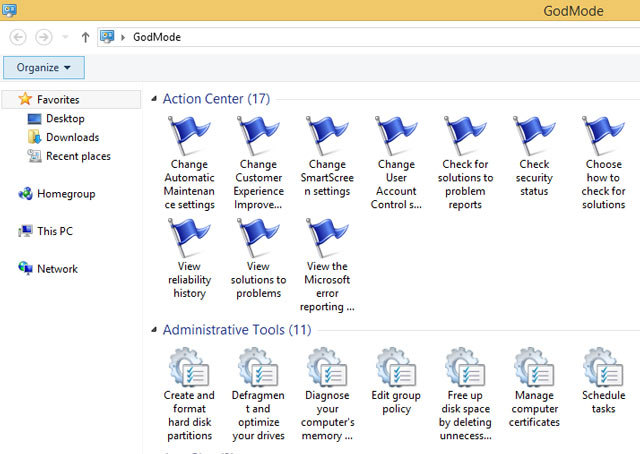
Windows 10 has many basic to Advanced Settings that can be used to control and Tweak your system. However, accessing the all settings in Windows 10 under the one roof is not available. Even though, you are the Geek, You can’t remember all those settings in Windows 10. They can be organised into one handy folder that is called “God Mode” by the Users.
How To Create God Mode in Windows 10
Creating the God Mode needs few steps,
1. Open the Windows Explorer, and tick the Check Box “Show File Name Extensions and Hidden Items”.
2. Now Create the New Folder in Anywhere and Rename the folder by Pasting the Following text as it appears
GodMode.{ED7BA470-8E54-465E-825C-99712043E01C}
3. That’s it, Now You will get the Control Panel Icon and Opening that will fetch all the settings that available in your Windows 10 System including Administrative Settings.
3. Directly Boot to Windows 10.1 Desktop
Windows 10.1 offers the two Interfaces: Start Screen With Apps, Traditional desktop. Windows 10 always boot into the New Start Screen, there you can access the Desktop. Windows 10.1 offers the Boot to Desktop Feature, which will give you the option to directly boot into Desktop rather than the Metro UI.
To Access the Boot to Desktop Option,
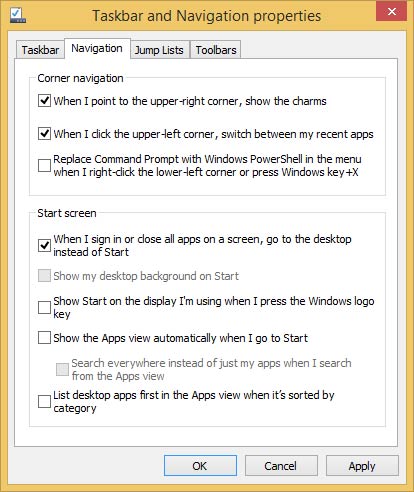
Right click or Tab on the Empty Space of Taskbar and Open the Properties. A Pop up window will open with Tabs. Now, Select the Navigation tab, there Under the Start Screen, Tick the Checkbox showing “When I Sign in or Closing the Application On a Screen , go to the Desktop instead of Start”.
Hereafter, Whenever you sign in or closing the App, you will be taken directly into the Desktop bypassing the Metro UI.
4. Sync Everything and Access Anywhere
In this latest Windows Operating System, Microsoft has integrated the Online Accounts of Hotmail (Outlook), Live and Other MS Accounts. To access all Microsoft Online Services, you have to sign into any of the above account. This integration has brought many online and cloud services to Windows 10 . Your favorites, email, One Note and other Data are synced with all your devices including Android and iOS.
Just setup Your own Microsoft Account with Local account in Windows 10 system. It will get you a lot of services and flexibility. This also enables the SkyDrive Cloud Storage Integration in your Windows 10 system. You can access all your cloud files, also Save the files through SkyDrive Storage from Windows 10.
5. Move the SkyDrive Location
SkyDrive is the Cloud Storage Service from Microsoft that has been deeply integrated in Windows 10. Moving SkyDrive to another location can be helpful for maintaining files. If you have more than one drive, SD card, then moving the SkyDrive will be useful.
To move the SkyDrive to Different Location in Windows 10 follow the steps below,
1. Open the Windows Explorer , in the navigation view, Right-click on the SkyDrive Folder.
2. Select the Properties from the menu.
3. Now, Select the Location Tab from the SkyDrive Window, and You can choose the move button to move the SkyDrive to different Directory.
6. Get the Hidden Start menu in Windows 10.1
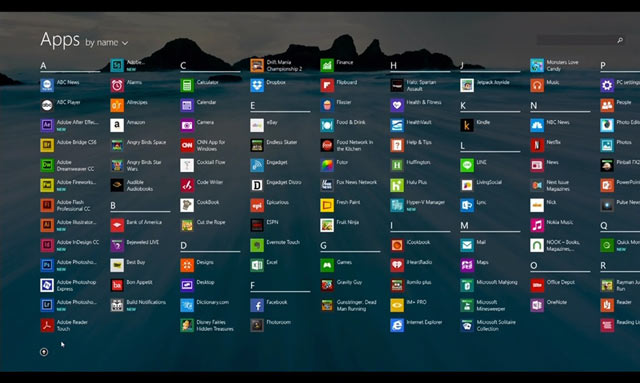
Microsoft has removed the start menu in Windows 10, and most of the users miss that too. However, you can get the Start Menu in Windows 10 .1 that is you can emulate the Start Menu in Windows 10.1 using the Options available in the Taskbar. Windows 10.1 Operates differently than Windows 10. You can access the all apps screen by Swipe Up or Click on the down button on the screen. You can also get the Other option to get the All apps in Windows 10.1.
Open the Taskbar and move to the Navigation Tab and Tick the checkbook of “Show the Apps view Automatically when I go to Start ” . Hereafter, Whenever you click the start button, you will be presented All apps views Instead of StarScreen.Though It’s not the Traditional Start menu, you can consider this as Modern Start Menu.
7. How to Shutdown Windows 10 Quickly
If you are the new to Windows 10.1, One thing you may have noticed that You can’t Shutdown the machine so quickly like before you have done in previous Windows versions. However, an easy Workaround will give you the Metro Option in Start Screen.
For that Create the New shortcut in the Desktop Screen. In the text field, type the ‘shutdown /s /t 10‘. The ‘t’ denotes the time delay in seconds in which your PC will shut down. You can change the time as per your wish. Then, Right Click on the Shutdown shortcut and select the Pin to Start option to show Shutdown in Start Screen.
8. Get the Admin Tools in Start Screen All Apps View
You may be noticed that in the All Apps view, all of the Administrative tools are not present. You can get them by changing settings of Tiles. To Unhide them, Open the Charms bar and Select ‘Settings’ and then ‘Tiles’. There you can change the settings. Now, you will get all admin tool in all Apps view.
9. Lock Screen Notifications

If you are a Smartphone user, Lock Screen Notifications are not new to you. Yes, Like you get the missed calls, Email, SMS Count in Lock Screen of mobile, In Windows 10, You can get the same. You can also customize the Lock Screen notifications by adding and removing the Apps there.
To do that, in Charms bar, Select Settings and Open the “Change PC Settings”. if you are the Windows 10 user, Go to General Settings and Lock Screen. For Windows 10.1 users, Shortcut of Lockscreen image will be there already. In the Lock Screen Page, You will be presented a list of apps with ‘+’ Sign. Click the ‘+’ Sign to get more apps.
10. Your Picture on Lock Screen
You can change the Picture of Lock Screen like any Mobile Devices. To Customize the Windows 10 Lock screen, Open the ‘Change PC Settings’ like above. Now Tab or Click the ‘PC and Devices’. You will now get a preview of your current Lock Screen with some options to Customize the Screen. Now, you can change the Background picture of Lock Screen from Your Computer, SkyDrive Images.
11. Use the Task Scheduler to Run Apps Automatically
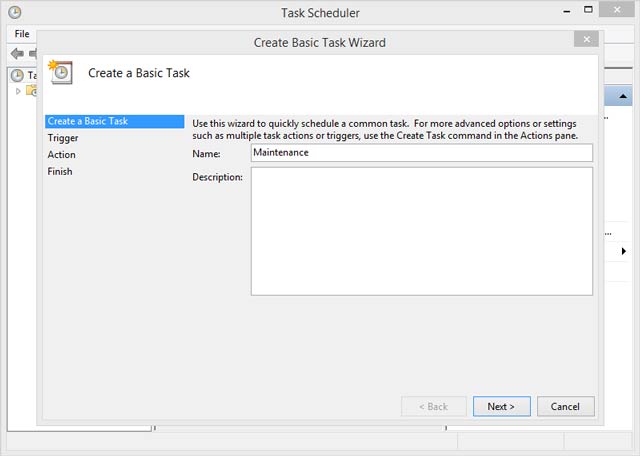
Task Scheduler is a Powerful Tool for Windows users. The Task Scheduler is the utility that enables you to automatically perform an action at a specific time or when something happens. For example, you can start your Favorite Programs automatically when you sign in to Windows 10. You can run the Maintenance tools and Anti Virus Applications at a specific time.
Open the Task Scheduler Tool and You will be presented with the ‘Create basic Task’ and ‘Create Task’. Choose the first one which is simple, and you can create tasks with the Task creation Wizard. Just follow the Wizard and complete the Schedule Tasks setup.
12. Make a Quick Search Using “Smart Search”
There are new ways of working with Windows 10.1. In the Start Screen, you will get the Metro Windows 10 Apps, Settings and more. You can use the Smart Search feature to search anything offline and online. Windows 10.1 Smart Search is now powered by the Bing Search engine. It will show the web results with the Internal Apps and settings. To Perform a Search, Simply start typing in the Start Screen, the Results will be displayed from the PC and Web. Press H and the search Panel appears with app, settings and Files. In Desktop Mode, Press WinKey + Q to show SmartSearch screen.
13. Refresh Your PC
To Speed Up your Windows 10 , Microsoft has added many new features to this Operating system. ‘Refresh Your PC’ is the important addition to restore your PC’s Speed like the Fresh Windows.
To Refresh your Windows 10 PC, Access your Charms Bar and then Click ‘Settings’ followed by ‘Change PC Settings’. There you can get the ‘Update & Recovery’ section with three options. One of the Option ‘Recovery’ is useful when you feel your system sluggish and hangs often. It will offer you three methods to fresh up your Windows 10 PC. Your System will be refreshed without affecting your Music, Videos and other files. The other Option should be only used at the last resort, it will completely remove your Windows and will start from Setup.
14. Create the Tile Groups With Name
In the Start Screen, the apps you have pinned will be displayed without any alignment. In Windows 10 , You can create the group of Tiles for personalization. That is you can create the Group of tiles with name like ‘Social’, ‘Games’, ‘Fun apps’.
To Create the Tile Group in Windows 10, right-click on the Start Screen and access the Customization option. Now the Tile Groups in the Start Screen will be faded, and text field will be shown for each group. You can assign the tiles to any group and also you are free to create a new group as well. When you finished, left-click the mouse button on the blank screen will finish the naming of groups.
15. Secure Your PC with
Security is one of the essential thing which should be integrated with any device to safeguard your personal information. Microsoft has done a good thing by adding the Windows defender as a default App for removing unwanted files. In Windows 10 , the Windows Defender is even more efficient, that monitors network behavior as well incoming connection and outgoing connection. Add more protection by turning on the firewall which is essential to block malicious connections to your computer.
16. Protect Your PC with SmartScreen
SmartScreen adds another layer of protection to your Windows 10. Whenever you run the executable file that has been downloaded from the internet or from disk, if it has malicious or unrecognized certificates, the SmartScreen will prevent this apps from running. You can also override the SmartScreen, if you know that the file is Genuine.
To Control the Smart Screen in Windows 10, Open the SmartScreen settings by searching the SmartScreen in the Charms bar. Now, you will get Two Results, ‘Turn SmartScreen Filter On or Off for Windows Store apps’, ‘Change Smart Screen Settings’. Open the Smart Screen settings for the Advanced settings panel.
17. Run Multiple Apps in Windows 10
Though, this feature have some limitations, it is a useful feature for all Windows 10 users. You can view two or more apps in a single view . For example, if you have screen display of 1366 pixels wide, possibly, you can view the two apps or an app with desktop side-by-side.
If you want to show three apps, you need at least 1,500 pixels wide. Just Open the apps and drag them side-by-side to show two or three apps in a single view. Also note that, all apps are not designed for this view. Play with your apps and find out the apps that support this feature.
18. Run Windows 10 Directly From USB or Pen Drive
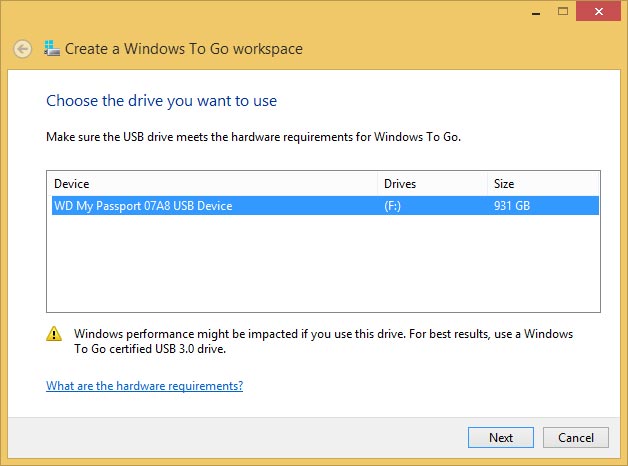
Microsoft has introduced new feature ‘Windows to Go’, which will help you to create bootable Windows 10 USB Disk for enterprise edition. If you are Windows 10 Enterprise, use this fancy tool to create Windows 10 Live USB Disk. For other Windows 10 versions, you don’t have the fancy tool, however you can do it via command prompt.
To Create Windows 10 USB Disk in Windows 10
- You need USB 3.0 Pen Drive with 32 GB Memory. USB 2.0 supported in some systems.
- You also need Windows 10 Disc or ISO Image.
- Next, Download and install GImage X program for deploying the Windows files in USB Drive. You can do this in CMD, for easy to use, you can install Graphical Interface program.
- Now, Open the GImage X program and move to ‘Apply’ tab.
- Now mount the Windows 10 ISO file in your computer and copy the install.wim file to favorable location.
- In the GImage X program, Select the install.wim file as source and your USB drive as destination.
- Then, Click the Apply button.
- Now Open the CMD Admin (Press Win+X and Command Prompt), and go to the Directory Windows System32
- From this location, run the following command
bcdboot.exe X:Windows /s X: /f ALL
- Note X: is the USB Drive Directory. So, change it to exact location when you run the above command
Now, your Portable Windows 10 Operating System is ready. You can install Windows 10 in SD memory Card, HDD by using the above method.
19. Improve the Performance of Windows 10 Using ReadyBoost
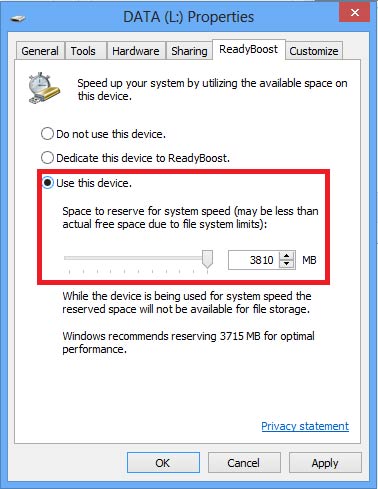
Windows 10 is pretty heavy compare to its predecessor. You need to have bigger memory to play smoothly with your Operating System. If you are low on memory, it will be painful to work in your PC. Like the previous Windows versions, Windows 10 have ReadyBoost to improve the Speed of the Windows 10.1 and 8. Utilize this feature and get a Faster Windows 10 system.
To use ReadyBoost, You need USB Flash Drive. Insert USB Drive and go to Computer, Right Click on the Removable Disk Drive and open the Properties. There move to the ReadyBoost tab and use your removable Device for ReadyBoost feature. There you can also select the memory to use the ReadyBoost function. If it is faster USB Drive, you will get more speed.
20. Configure the Mail App
You can send emails from Windows 10 using Mail App. You can configure Gmail, Outlook and other email Accounts and get the notifications real-time. You can keep an eye on the live tiles in start screen for the new mails. When you find the interesting content in mail app, you can directly to share with social networks using the Share charm.
To Configure the One or Multiple Mail accounts, Open the Mail app from the Start Screen. Now Access the charms bar, Click Settings > Account. Now, Click Add account and Select the Email Provide from list. If your mailing provider is not in the list, select the ‘IMAP or EAS’.
21. How to Create Your Own Windows 10 Theme
In Windows 10, You will have some default themes. If you want to create your own theme, add your own photos from the disk and make it within few minutes. You can create as many themes you want to decorate your desktop. Other than this you can download many Windows 10 themes from online. If you don’t have the time, Choose the best Windows 10 Themes, We have shared here > Top 30 Best Windows 10 Themes, Visual Styles and Skins.
22. Customize the SendTo Menu
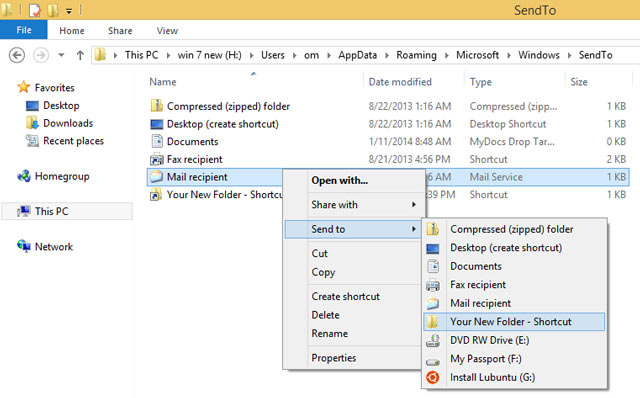
SendTo menu is spectacular Feature not by Default, but When you customizing it. Yes, Managing files and folders in the Windows 10 shouldn’t be the complex one. To make it more easy, you have to customize the SendTo menu. For example, Many users saving the files in Desktop for easy to use. Within few days, chunk of files will eat all your Desktop space, and it also doesn’t look beautiful. Now, You have to move files from Desktop to some other folders. to do that You have to copy and paste the files in respective folders. By the way, You can do this by adding your favorite folders in SendTo menu. That makes you possible that You can directly send any files to your Favorite folder with one SendTo Click.
To Customize the SendTo Menu in Windows 10 ,
- Open the File Explorer and in Address bar type
C:UsersAppDataRoamingMicrosoftWindowsSendTo
- Then, Open the any Folder that Wish to add in the SendTo menu. Go back One Step to parent folder, and create the Shortcut for you favorite folder. The Shortcut will be created.
- Copy that shortcut and place it in the SendTo menu folder that we have opened in the First step.
23. BitLocker Encryption
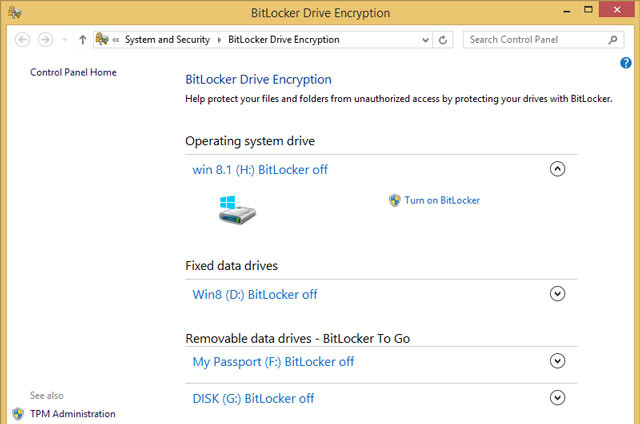
If you are business person or you have some important data on your computer, encrypting them is the good thing to do. Windows 10 have the Microsoft’s proprietary encryption application which is built into Windows itself. If you want to encrypt your Windows Drive, Your PC has TPM Module Installed. Don’t worry ,If your system doesn’t have that, you will get slightly less secure mode compare to previous one.
Turning On the BitLocker is pretty easy, Search the BitLocker in Charms Bar. Click ‘Manage BitLocker’ to open ‘BitLocker Drive Encryption’ Window. Now, Click the ‘Turn On BitLocker’ next to your local Disks. Next, You have to choose the Authentication method. That is, You can use Smart Card or Password, if your PC doesn’t have TPM Module, you have to go password method. Now Choose Your Strong password. Then, you will get a prompt to store backup Recovery Key. You have four choices, 1. Microsoft Account, 2. Another USB Flash Drive, 3. As a File, 4. Print it manually.
24. Action Center
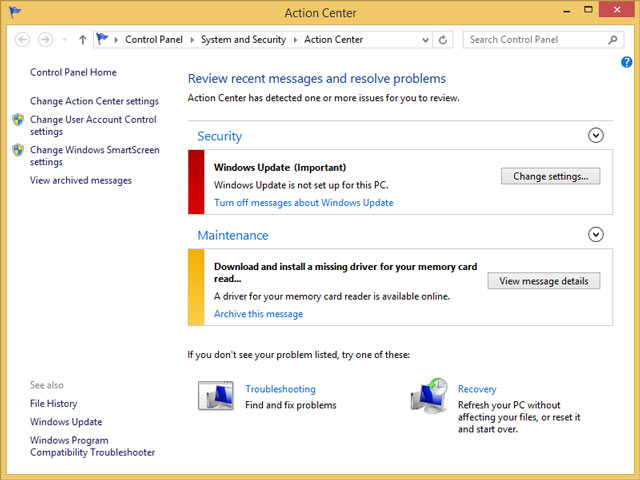
Use the Action Center to check everything okay with your PC. If your PC have any issues, you can fix them in Action Center. Actions Center will check whether Firewall is on or off and will notify the important Windows Updates and some other things. If you have issues in your PC, Action Center flag will be shown with red mark. When you visit the Action center, the problems will be displayed the Red mark. You can fix those issues right there by clicking Turn On button, If you firewall is turned off. Like that, you can take necessary actions to run your PC Smoothly.
25. Defragment Hard Disk
You can get the maximum performance from Your PC, If you keep defragmenting the Hard Disk periodically. After long time usage, Files in your PC will be fragmented. The solution was to run the Disk Defragmenter manually. This finds the pieces of files and put them back together, so that you can access theme faster.
You can Search the ‘Disk Defrag’ in Charms bar and Start the Defragmentation. You can also set the Schedule defragmentation for automatic defragmentation.
26. Customize the Start Up Applications to Speed Up Windows 10
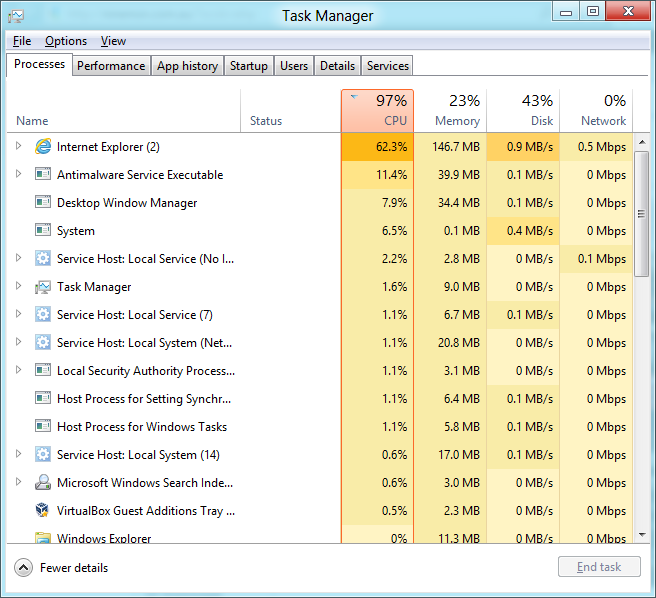
Many Windows Applications will load when your Windows start-up. This is in order for certain software to be ready as soon Windows loads. It will help those Windows Software programs, but it will certainly delay the Booting speed of Windows 10.1.
Read More Here: Customize the Start Up Apps to Speed Up Windows 10.1
27. Best 10 Tips Speed Up the Booting of Windows 10
Here in this post I want to share some more useful tips to speed up Windows 10 Boot time and How to boost the Windows 10 Performance?
Continue Reading: HOW TO MAKE or SPEED UP Windows 10 PC MORE FASTER?
28. How To Create Windows 10 Apps on Your Own
“Project Siena” is the Windows 10 App that will help you to create the Powerful Windows 10 apps without any Programming and coding. You don’t’ need to type the dozens of coding in many hours to create Windows 10 Apps, just install the Siena App and Develop your Windows 10 app with no time. You can share your Windows 10 app with your friends or anyone in the World.
Continue Reading: Create Windows 10 Apps Easily
29. How to Install Third-Party Windows 10 Themes
As usual Windows 10 also has no support for unsigned custom third-party Windows 10 Themes. If you want to install fresh and beautiful Windows 10 themes, visual styles and Skin pack for Windows 10, then you have to patch system files themeui.dll, UXInit.dlland uxtheme.dll on Windows 10.
Continue Reading: Install Third Party Windows 10 Themes, Skins
30. Best of Windows 10 Posts from Us
- How to Create Recovery Disc for Windows 10 (Using Flash Drive and Optical Disk)
- How to Get Full Aero Glass Transparency in Windows 10 easily
- Top 20 Best Windows 10 Apps [Must Have]
- 6 Best Top Light Weight Antivirus Software Apps for Windows 7,8, XP
- Run Windows 10 Metro Apps on Desktop Mode
- Fix ‘Synaptics Touchpad not Working’ problem on Windows 10
Raja CRN
Tech enthusiast and developer.