
Know the Best & Easy ways to install Custom Recoveries like ClockWorkMod (CWM), TeamWin Recovery Project (TWRP), Philz Touch Custom Recovery in Android Phones. By installing custom Recovery in Android Phone, you can install custom Kernels, Custom ROM(Cyanogenmod, AICP).
What is Recovery in Android?
Basically, Android Recovery is limited boot mode which allows you to flash/install OTA Package update, Wipe Cache memory and User Data reset. By default, Android Phones will come with the Recovery developed by Phone Manufacturer. The default Recovery is called android Stock Recovery.
The system default Stock Recovery can only do some basic things like installing Android OTA Update, Cache Clear and so on. However, the Stock Recovery will prevent you from installing the Custom ROMs and other customised frameworks like XPosed Modules.
Why should I Install Custom Recovery in Android?
You may ask what is the need of installing the custom Recovery in my Android Phone? Let me answer your question. Custom Recovery gives the ability to install latest version of Android like Android 7.1, Full device backup, Custom Kernels, Custom Frameworks.
Popular Custom Recoveries
There are many Custom Recoveries for available for Android. However, the following Custom Recoveries are most popular such as
- ClockWorkMod (CWM),
- TeamWin Recovery Project (TWRP),
- Philz Touch Recovery.
If you decide to install Custom Recovery in your Android Phone, you can choose any of these popular custom Recovery.
I’ll share the installations instructions to install any custom Recoveries like CWM, TWRP, Philz in Android phone using following ways.
How to Install TWRP Custom Recovery on Android Phone
TWRP or TeamWin Recovery Project is the most Popular and widely used Custom Recovery by Android users. The TWRP Custom Recovery is maintained by the Ethan Yonker (Dees Troy). In addition, some other contributions are also coming from Android Community members.
In the early days, Other custom recoveries only use Hardware keys like Volume Up and Down button to select menus. But, The TWRP custom recovery comes with the Touch Driven User Interface with customization options. Any one can easily use the TWRP Custom Recovery options in the Recovery mode.
Recently, the Latest version of TWRP 3.02 released with many customization options. Furthermore, The GUI of the TWRP is also fully XML driven. Therefore You can create the new design for TWRP with themes.
Download TWRP Custom Recovery
You can download the TWRP Custom Recovery from the Official TWRP website. In their official website homepage, You can find the generic version of the TWRP recovery. Also, TWRP Team releases the Device Specific TWRP Custom Recovery. So that, You can install the TWRP Custom Recovery without any compatibility issues in your Android Phones.
To download the device specific version of the TWRP Recovery, Go to this page. There you can search for your device specific TWRP version. For example Type the Moto G to get Moto G Android Phone TWRP Custom Recovery. The search result will come with model name and device code like falcon and year. So that, You can easily find your device TWRP Recovery and download the same.
You can install the TWRP Custom Recovery in Android in different ways. Here, I’ll show the simple way to install TeamWin Custom Recovery on Android device.
Install TWRP Custom Recovery via ADB or FASTBOOT Install Method
You need some prerequisites to install the TWRP via ADB (Android Debug Bridge) and Fastboot.
Install ADB, Fastboot and Drivers
You need ADB, Fastboot and other driver files to install TWRP Custom Recovery via Windows PC, to proceed further.
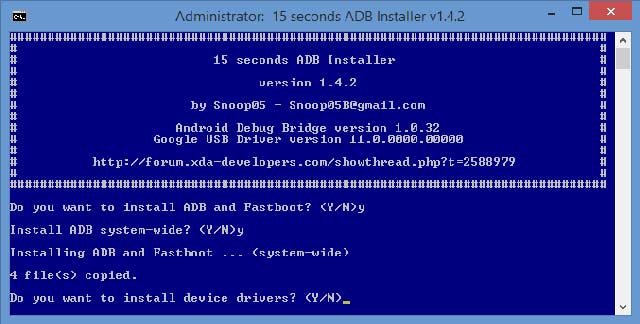
To keep things simple, there is simple Tool available to install ADB, Fastboot and driver files in Windows 10, 8 or 7. Just download the 15 Seconds ADB Installer v1.4.3
Simply download and Run the above tool in Windows PC. Probably, this ADB installer will install ADB, Fastboot and Google Drivers in Windows 10, 7 or 8in 15 seconds. Furthermore, This tool requires administrative privileges.
Enable Developer options & USB Debugging
By default, the developer options settings are hidden in Android devices. Therefore, You have to enable the developer options settings. To do that Go to Settings > About Phone > then by Tapping Build Number seven times.
Next, Settings home screen, You can see the Developer options above the About phone. Open Developer Options and enable the USB Debugging.
Steps to Install TWRP Recovery via ADB
- Connect your Android Phone to PC via USB cable
- Download the TWRP 3.0.2 or any latest version to your PC using the above link.
- Open the CMD (Command Prompt) and then change the directory location in CMD to TWRP File location.
- In this step, Type the Following command in your CMD. If Phone asks permission “Allow USB Debugging”, tap OK.
adb reboot bootloader
- Now, Your Phone will Turn off and Boot to the FASTBOOT bootloader mode. Now Type the Following command in your CMD, (Note: twrp-3.0.x.x-xxx.img is the file name of the Downloaded TWRP file. )
fastboot flash recovery twrp twrp-3.0.x.x-xxx.img
- After the Custom Recovery Flashing process completed, type following command to reboot your phone,
fastboot reboot
Install TWRP Custom Recovery Using TWRP Manager
You can also install the TWRP Custom Recovery via TWRP Manager Android application. However, this App requires Root Permission to install TWRP Custom Recovery in Android Phone. So, You need Rooted Android Phone. This is the simple method to install TWRP on Android Phone but Requires Root.
Rather than, If you want to install TWRP Custom Recovery without ROOT, you have to do it using the ADB method.
Use TWRP Manager to backup your Android Phone completely. If something unexpectedly happens, You can restore the date back.
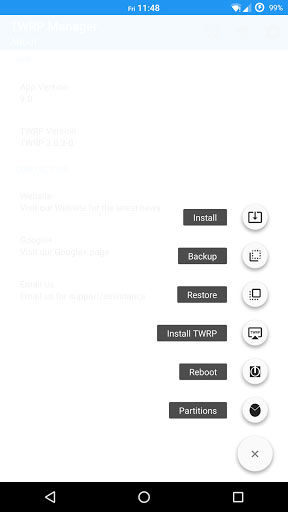
Installing the TWRP Custom Recovery using this Android app is very simple. Just download and store the TWRP Recovery file in the Internal storage folder.
Simply Tap TWRP Install to locate the Downloaded TWRP Recovery image file and start the installation process. Once the TWRP installation Successfully completed, you can use this custom recovery to any other tasks.
Download TWRP manager from Play Store
How to Install CWM & Philz Recovery on Android
You can simply follow the above ADB Instructions to install CWM & Philz Recovery in your Android Phone. However, the CWM & PhilZ Custom Recovery Development has been ceased. So that, install the TWRP in Android Phones, since it is Currently in active development.


